
Summary
- What is Jenkinsfile?
- From Scripted to Declarative Pipeline Syntax
- Basic Structure of Jenkinsfile
- Post Build Actions in Jenkinsfile
- Define Conditionals / When expression
- Using Environmental Variables in Jenkinsfile
- Using Tools attribute for making build tools available
- Using Parameters for a Parameterized Build
- The complete code
- Conclusion
In this post I am going to show you what jenkins file is how to create it and what the syntax looks like.
What is Jenkinsfile?
If you are familiar with Jenkins, you would usually create new jobs or builds and configure them. Basically what Jenkins file is that instead of you creating and configuring jobs on the Jenkins user interface you would write a file or you would script that build and it’s configuration in a file.
So Jenkins file is pipeline as a code.
It’s a scripted pipeline which is part of this whole infrastructure as a code concept. Respectively you would create Jenkins file in your repository with your code.
From Scripted to Declarative Pipeline Syntax
I have this demo project here that I am going to use to demonstrate Jenkins’s file and configure a build with it.
The first step is to create jenkins file in your repository so I am going to create a new file in my dev branch.
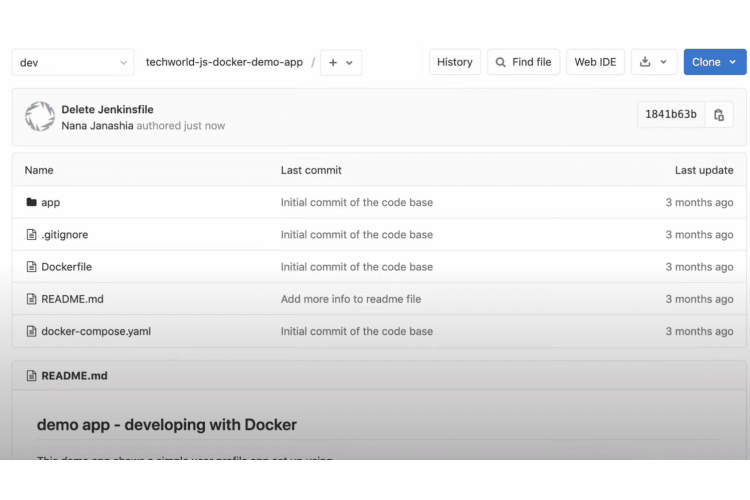 And call it jenkins file. The code is where your jenkins file lives.
How do you create a jenkins file? How the syntax look like?
This is the most basic jenkins file that basically does nothing.
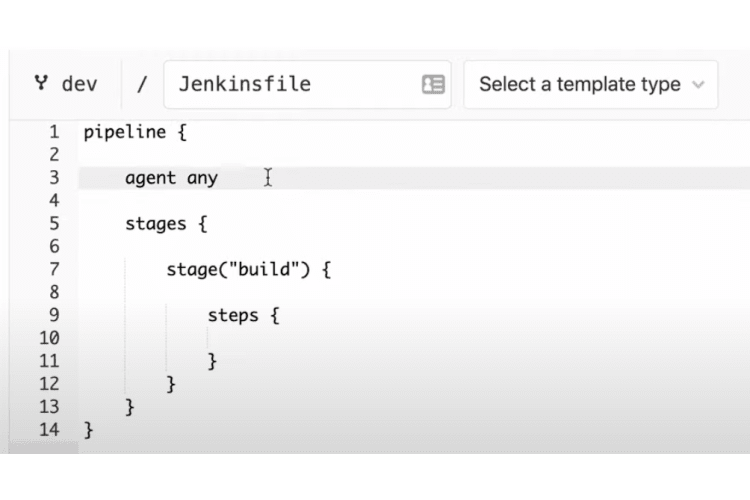
But this is the basic syntax but here I am going to explain you the required attributes for jenkins file.
The first thing is that jenkins file can be written as a scripted pipeline or a declarative pipeline.
The scripted pipeline
The scripted pipeline was the first syntax of jenkins file. It allows to write the whole configuration of the Jenkins file using groovy script.
There is no predefined structure there. However for people who didn’t know or doesn’t know groovy syntax or who hasn’t worked with groovy is a little bit difficult to start with.
The declarative pipeline
That’s why as a recent addition they actually edit declarative pipeline syntax from jenkins file which is easier to get started with. It has of course it’s not as powerful as the scripted pipeline because here you are not limited in any way. But it’s easier to get started with because you have a predefined structure.
Basic Structure of Jenkinsfile
What we saw here the node definition is basically same as these two lines here.

Pipeline
So in a declarative pipeline you declare that you are writing a pipeline. An agent any basically means that this build is going to on any available Jenkins agent.
An agent can be a note it could be executors on that note whatever. This is more relevant when you have a Jenkins cluster so to say with master and slaves where you have Windows nodes and Linux nodes etc.
But here for the beginning for base we just say agent any. We will just run with the next available agent.
These two are equivalent to this one here and they are required attributes you always have to use them.
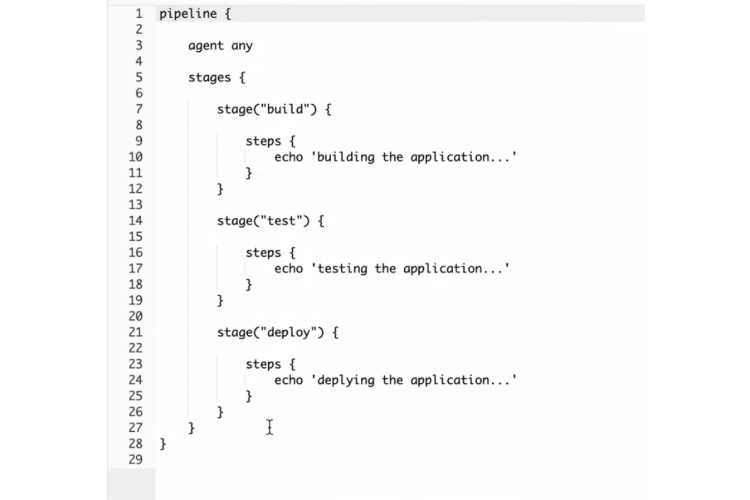
Stages
The next required attribute is stages and this is where the whole work actually happens.
You have different stages of that pipeline and inside the stages you define stage name and you can define as many stages as you want.
Usually you have something like this so you have a build stage have a build stage maybe you have a test stage and then you have a deploy stage like this.
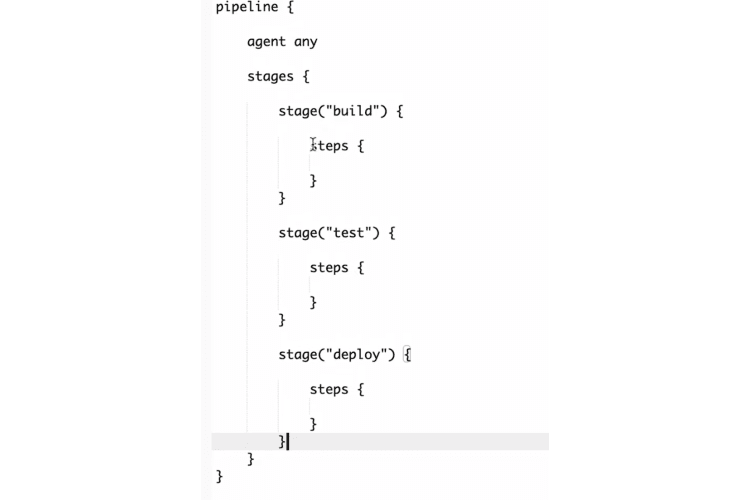
You can have additional ones like for example you might have a check out stage stage here and I don’t know cleanup stage afterwards whatever. As you see inside the stage you have the steps and here goes the script that actually executes some comment on the Jenkins server or Jenkins agent.
For example if you are building a JavaScript application all the NPM install NPM build etc scripts will go here like this.
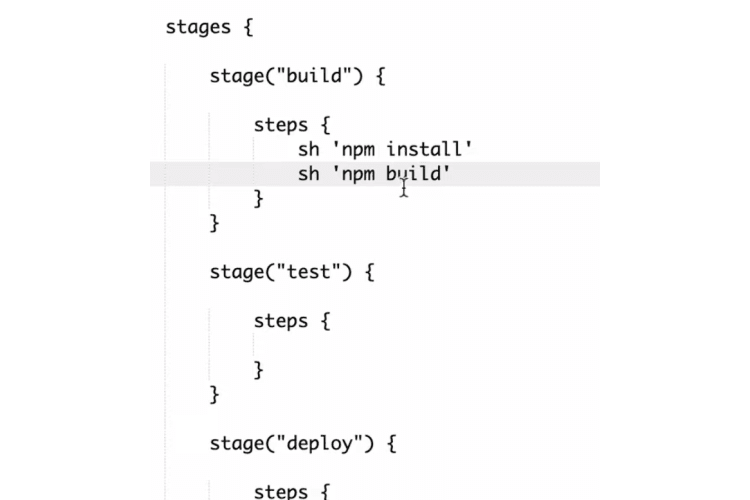
If you are you know running tests or for Java back-end all the test execution scripts will be here and the deployment script will be in the test section.
Right now let’s just write simple echo comments to kind of test this so here we are going to say a building the application. Here we are going to say testing the application.
In here we are deploying the application and this is a very Jenkins file and this should work already.
So I have the Jenkins file and that just basically echoes some stuff. And now let’s see how to actually use that in a Jenkins pipeline.
The second step will be to go to Jenkins to create a new build again. I am going to call it my app pipeline and I am going to create a multi branch pipeline.
Here’s a configuration where I select the git repository that I want to build. I am going to configure that repository credentials.
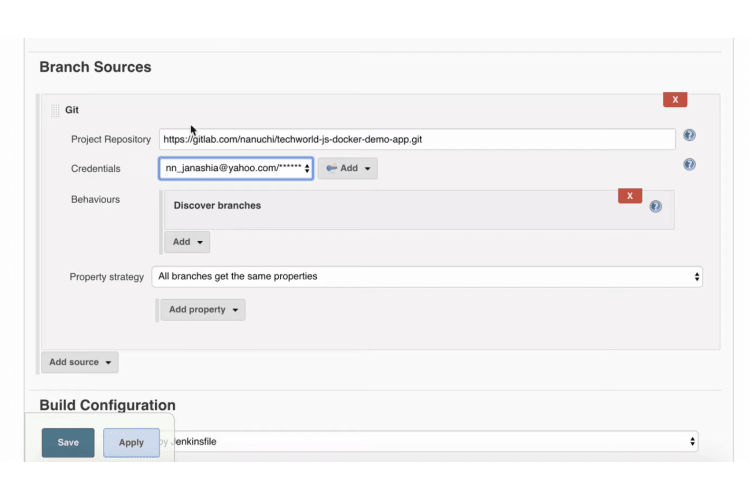
That would be it so basically this is my configuration and here I can specify which branches I want to build. I am going to leave it at all the branches and let’s see what happens.
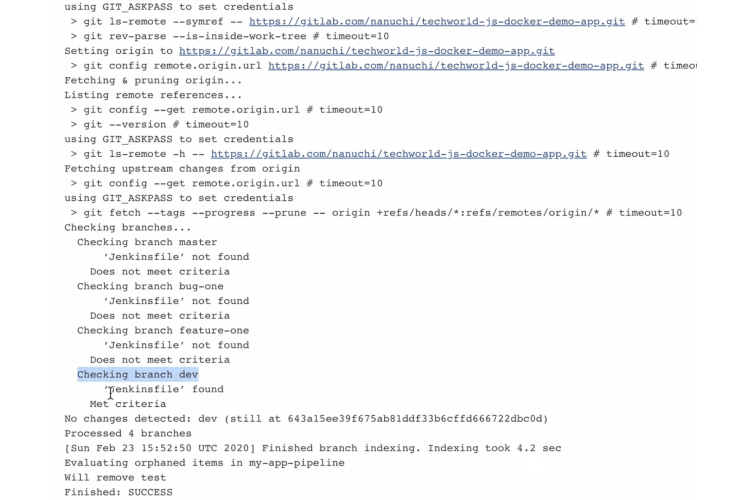
Here you see that it just basically went through all the branches that I have master dev. I have some test branches there and it scanned all the branches for Jenkins file and only found ranks while in dev branch because that’s were created and it built dev branch.
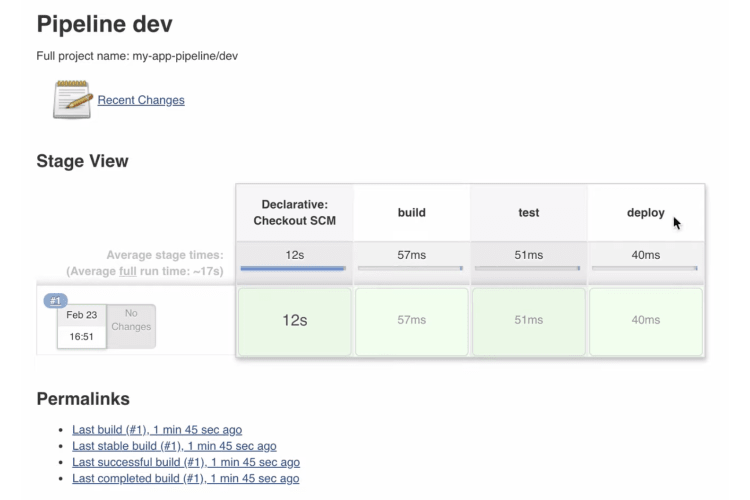
Let’s see that actually see that dev branch was built by jenkees file. The stages that we defined in the jenkees file are this one here so we said build test and deploy. And to each one of them you can see this echo comment that we defined. So building the application testing the application etc.
This is all you need to do in order to configure a pipeline to build from Jenkins file. The rest of the configuration of individual steps of built pipeline will be done in a Jenkins file itself.
Let’s go back to the Jenkins file and how can we see what attributes we can use to configure different parts of the build.
This is the basic syntax where we have the base construct inside stages where we defined three different stages.
Post Build Actions in Jenkinsfile
Another thing you can do with jenkins file is that at the end of it you can define post attribute.
What it does is basically executes some kind of logic or some kind of scripts after all the stages are done.
And inside the post there are different conditions that you can execute your scripts on.
Always
For example if I say always in the post condition it means that this script or this logic whatever is in there will be executed always no matter if the field failed or if it succeeded or whatever happened this will be always executed.
This could be something like sending an email out to the team about the build condition because you want to know whether it failed or succeeded or whatever happened.
Success
Another condition is success. You will execute a script here that all is only relevant if the build succeeded.
Failure
You have the same thing with failure. You can define all the different conditions in the post block and there are a couple of more but to generalize in the post block you basically define expressions of either build status or build status change.
For example if the last build change and now it’s green again you can use that condition as well.
Define Conditionals / When expression
Another thing you can do in Jenkins as well which is very useful is define expressions or conditionals for each stage.
For example you only want to run the tests on development branch build. You don’t want to run tests for feature branch build or any other builds.
What you can do here is inside the stage block you can define so-called when expressions. When should this stage execute. The syntax for that is like this and inside you have expression block and here you find basically your boolean expressions.
The branch name or the current the active branch name in the build is always available in jenkins file through an environmental variable that jenkins provides it.
Environment variable is called branch name and that is just available or you can also write like this and that is basically just available for you out of the box and you can use it to check what the current branch that’s building is.
So if I want to check that it’s a dev branch i can do like this.
And this stage will only execute or this part of the stage will only execute if the current branch is dev if not it’s just going to skip.
And the same way like you would do in if expressions you can also add or end expressions here so you can say I want to run this stage if it’s a dev build.
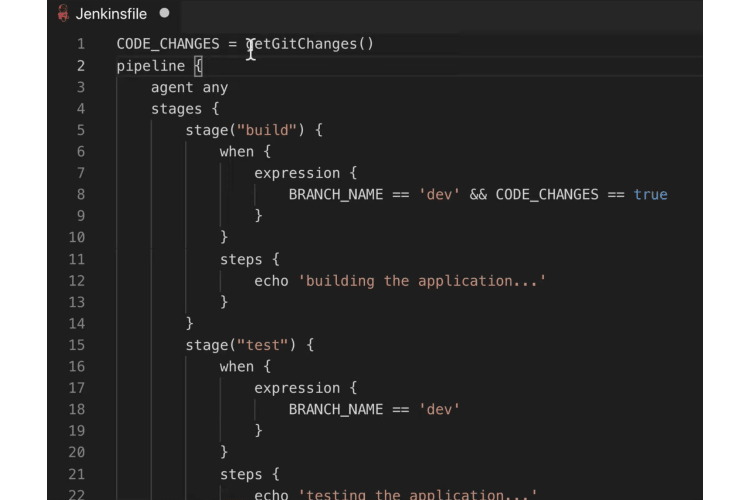
If it’s a master build I’d say you can do it like this or in other applicable use case for when expressions is for example you only want to build your application if their code changes made in the project.
So for example in the build step I can do something like if it’s a dev and code changes equals true.
And this could be a variable that you define yourself at the beginning. Let’s say outside the pipeline and that basically has logic where gets heat changes or something like this. So basically this will be a groovy script that checks whether there has been any changes made in the code and sets the value of this boolean.
Using Environmental Variables in Jenkinsfile
Jenkins provides some environments of variables out-of-the-box for you to use them in jenkins file like current branch name. But there’s some other stuff that you might need for the logic. For example you want to know which build number the current built here so you can use it in your versioning or some other stuff.
How do you know what variables you have available from Jenkins ?
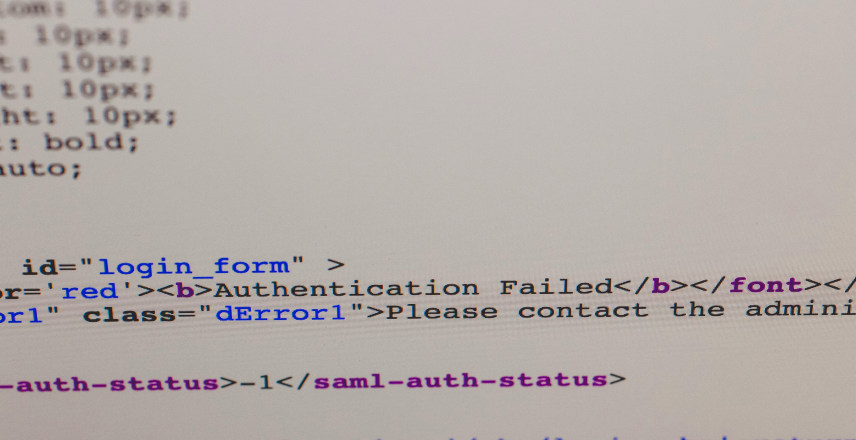
The location where you can find that which I find pretty practical is in your Jenkins. There’s a URL in bars dot HTML that basically provides you with the list of all the environments of variables and you can use them in your Jenkins file/
This is the one that we used and also you have descriptions for each one of those that you want to use.
localhost:8080/env-vars.html
replace localhost:8080 with your server url or IP.
How to define your own environment variables in Jenkins?
In addition to the ones that Jenkins provides you can define your own environmental variables. This is also a common practice.
Let’s see how to do that !
In Jenkins file there is an attribute called environment. Whatever environmental variables you define here will be available for all the stages that you have in the pipeline. So for example if you need a version in many different stages in your pipeline you would define that version here.
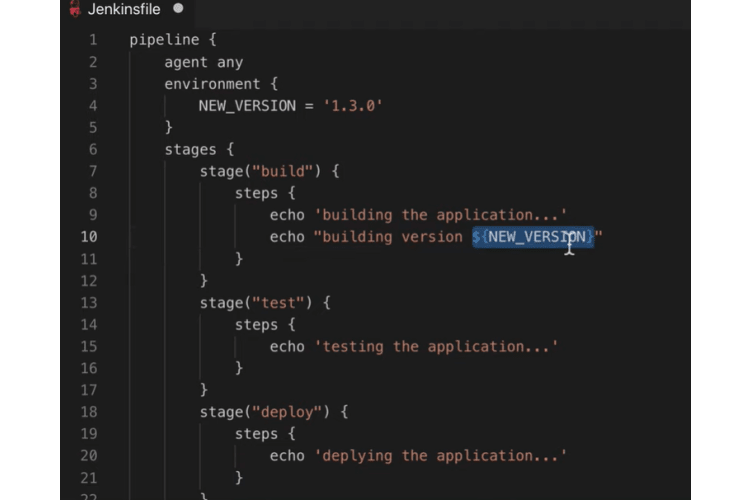
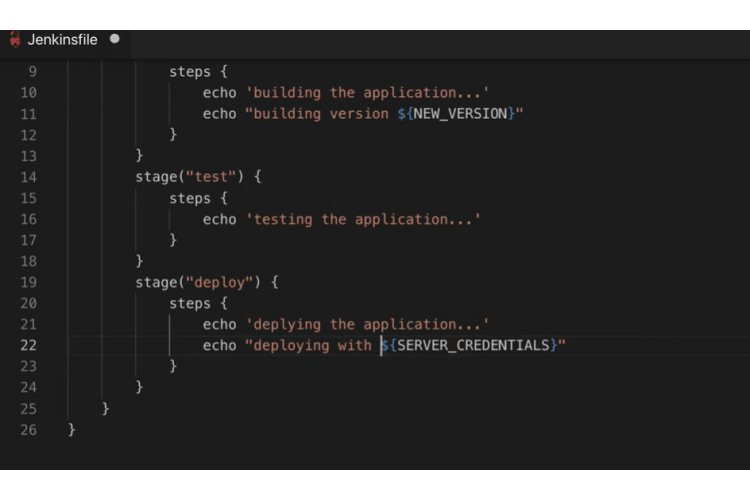
Let’s actually go and do that so version and let’s just say whatever. Usually you would calculate the version like you would extract it from your code but I am just going to write it like this.
The way that you can use that environmental variable in your script is like this so let’s see building version you. And you also see the syntax highlighting that this is interpreted as a variable.
An important thing to note here is that if I copy that and I put this in single quotes this is what happens and this is a syntax of groovy if you want the variable to be interpreted as a variable in a string you have to enclose it in double quotes something to be aware of.
Use environmental variables for credentials
Another practical example of using environmental variable can be credentials.
Define credentials globally
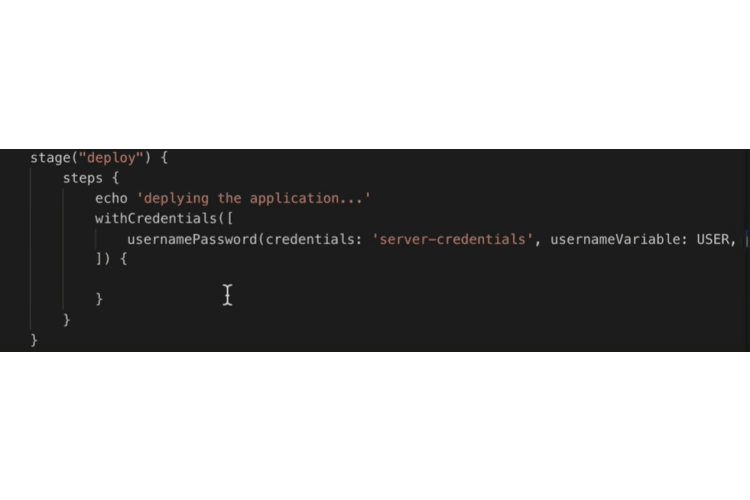
For example you have a stage that deploys your newly built application to a development server let’s say and for that stage you need credentials of the development server to connect to it and to copy the newly built artifact.
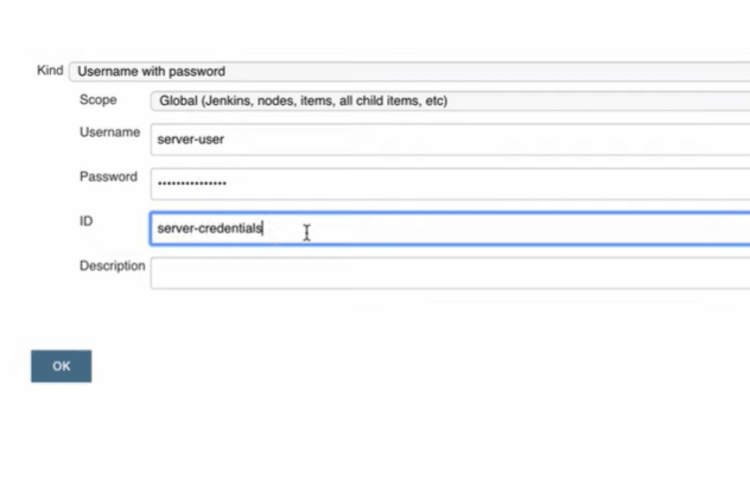
You would define credentials. Once you have defined credentials in Jenkins you can use that in Jenkins file. One way to do that is in your environment block you would say server credentials and you would extract the credentials from Jenkins and let’s see how that works.
credentials("<id goes here>")
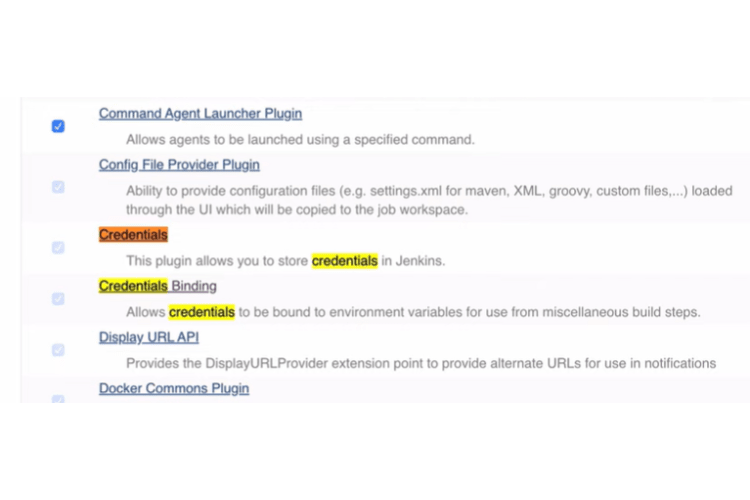
This is method or function that binds the credentials that are defined in Jenkins to your environmental variable. That is actually separate plugin that you have to install in Jenkins. It’s called credentials binding plugin which makes it possible to use Jenkins credentials inside the jenkins file.
As a parameter it takes the ID or reference of the credentials in Jenkins.
Let’s go back to Jenkins and see our credentials so this is a global scope. If I add here a credential let’s say username and password I don’t really just say server user whatever. And this is the ID of the reference let’s call it server credentials and if I create this I will be able to use that credential inside the Jenkins file using that reference or the ID that I provided.
Now I can use that environmental variable in stage the same way as you version. I have to enclose it in double quotes and like this and obviously you are not going to be using that credentials in a string it would be a shell script.
The same way you can provide it inside there.
If you need that credentials only in one stage it actually makes sense to read it from Jenkins in that stage as well.
Define credentials locally to a stage
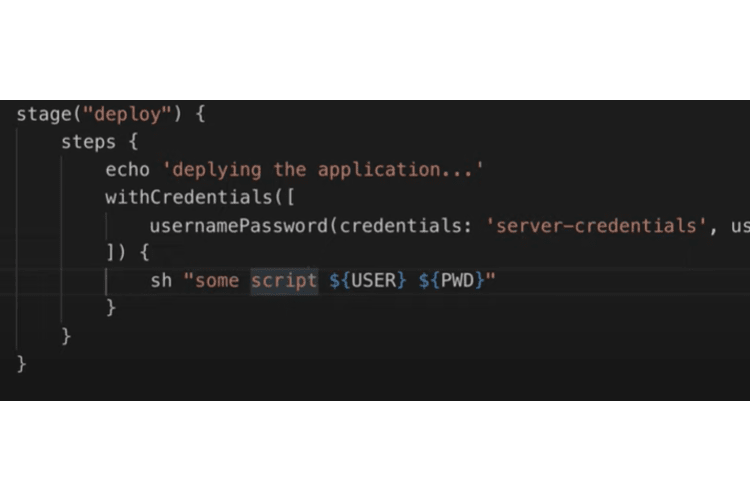
Another way to do that is instead of defining that in environment block. This is the syntax of wrappers so to say. You can directly define it here. Instead what you can do is use with credentials wrapper.
That takes as a parameter and object this is object syntax in groovyand that object you will be
usernamePassword().
That is basically a function that lets me get password and user name of that credentials individually. I pass it inside the object and as parameters here I can provide credentials ID which is the same as here.
The reason why I can use username password is because the type of credential that I created. The server user here is of type username and password it’s why I can use it here. After the ID of credentials I can get my username and I can store it into a variable name that I want.
I am going to call it user and variable and I can store it into password. So what this will do is take the username and store it into variable I want to call user and same with password.
So now inside this block with credentials I can use user and password variables. If I have a shell script here some scripts I can like I don’t know copy the artifact to some place I can use my username and password like this so a user and password. This will be the script some commands some actual shell commands and username and password variables inside the script.
Note: You have to have these two plugins in Jenkins let’s actually go and see those two plugins. I have credentials plug-in that allows me to create credentials inside Jenkins UI and I have credentials binding plugin that allows me to use those credentials in my Jenkins file through environmental variables.
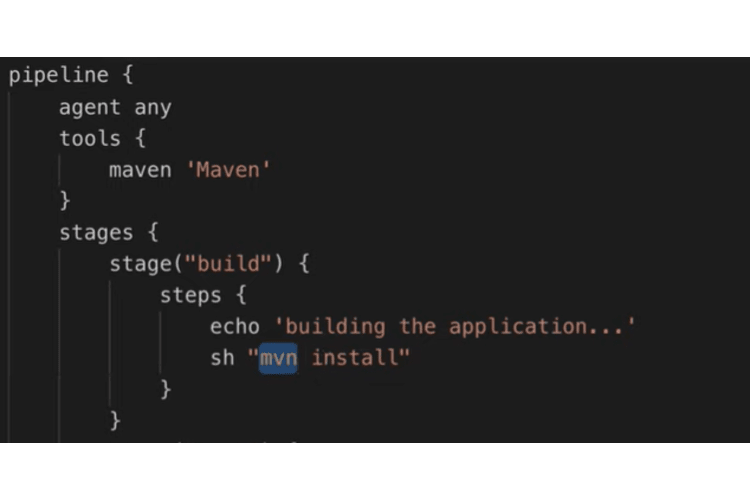
Using Tools attribute for making build tools available
Another useful thing that you can use in your file is tools attribute.
So what tools does is basically provides you with build tools for your projects. If you have a front-end banking application you will have some build tools configured for that it could be maven Gradle or some other tool that you use.
Obviously when you are building an application you want to have those tools available so for example in build you would run something like maven install or Gradle build whatever and you need to have those tools available.
One way to have those tools available is through these tools attribute. There are three tools right now that’s jenkins file support that’s Gradle maven and JDK. If you need yarn or npm for example you have to do it in another way if you want to have a complete overview of how tools work and how you can use any build tool in your jenkins file from your jenkins configuration.
I am just going to show you how to let reboot works and the way you can define the tools here is using name that is supported.
Next to the tool you have to provide the name of the tool and that has to be pre-configured or pre-installed in Jenkins.
The way that you can check that is in global tool configuration. Maven is in most of the recent versions pre-installed and pre-configured. You have that and that is the name so name of the installation that you have to provide in your Jenkins file using quotes.
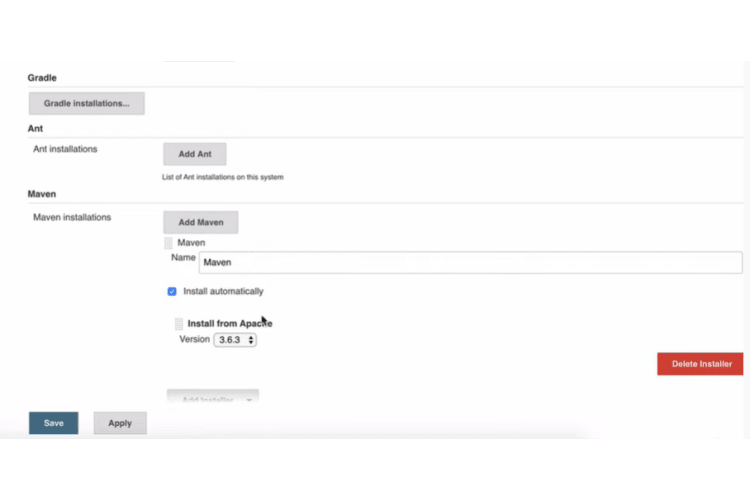
So this definition he will make maven comments available in all the stages.
Using Parameters for a Parameterized Build
Another thing that could also be helpful in pipelines is parameters. Maybe you have some external configuration that you want to provide to your build to change some behavior.
An example could be that you have a bill that deploys your application to a staging server let’s say and you want to be able to select which version of the application you want to deploy.
Here in parameters you will define the selection and the way you can write that is like this.
So you have the type first of the parameter and inside you provide the name of the parameter that’s how it’s going to be displayed let’s say call it version you can provide default value I am just going to leave it blank and you can add the description so that other people also know or maybe you later know what that parameter is meant for.
It’s a version to deploy on prod there are different types of parameters support.
For example instead of string you can have a choice which let’s call it versions so instead of having to enter input a version name you can have predefined choices of different versions that you can actually choose from.
Here you know to say choices and let’s say like this and this will also have its description nicely playing for now. You also have some other types like boolean.
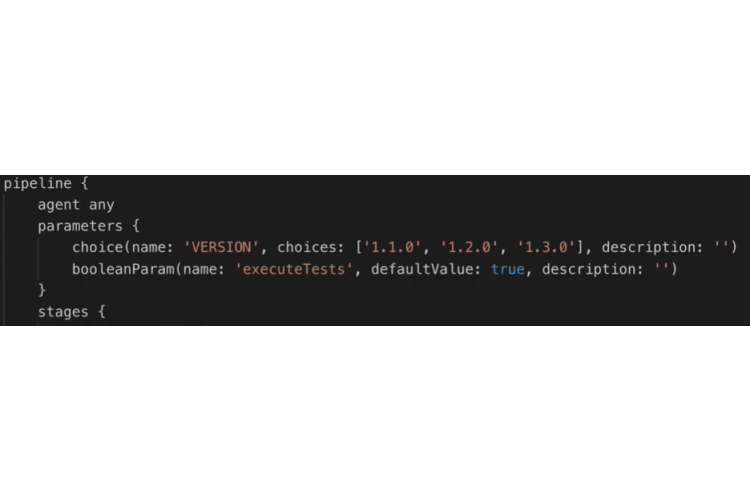
This could be for example you want to skip a certain stage on some builds and you can do that here. Let’s say you execute test parameter default value will be true and description let’s leave it here.
Now we have defined the parameters and we can actually see in practice how they are displayed in Jenkins built. You can use these parameters in any of your stages which is pretty straightforward. You remember the when expression that we use so parameters are suitable usage for expressions.
For example here we want to define that whenever expression so in the when expression we can use the parameter so we can say that if execute tests parameter is set to true only then we are going to run tests if not we are going to skip that. So this step will only execute if execute test that’s and this is how you can use the parameters if execute test is true.
If the param execute test is set to true this is going to execute if you set it to false this will be skipped. The version we can use let’s say double-quotes deploying version like this.
Let’s actually execute this jenkees file to see how it looks like in Jenkins.

Now, let’s see where I see my parameters so in pipeline view I don’t see any configuration. Here instead of built I see button called build with parameters so before if you don’t have any parameters set then it will just say built.
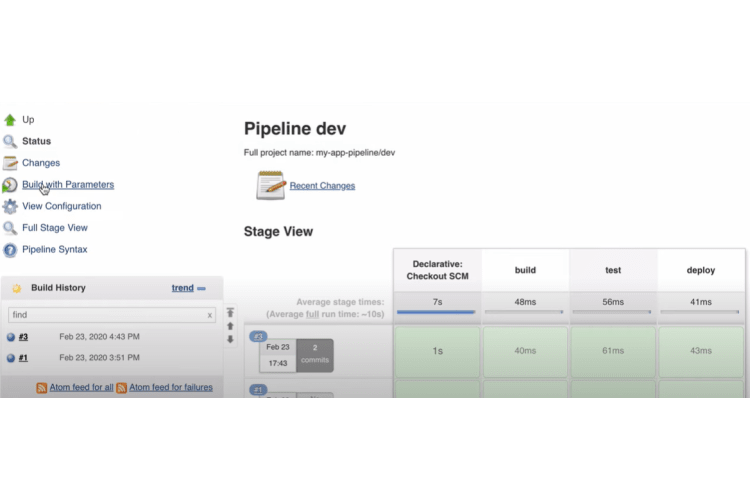
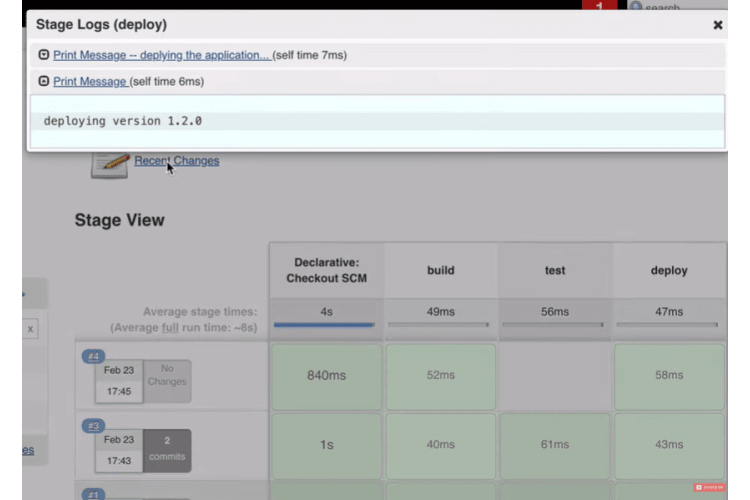
So I am going to click that and I am going to see both of the parameters listed here so I can choose a version here from the list so let me just say in 1 to 0 and I am going to uncheck execute tests. If I build that let’s see so the tests should be skipped because we unchecked it and let’s see what the deploy stage says deploying version 1 to 0.
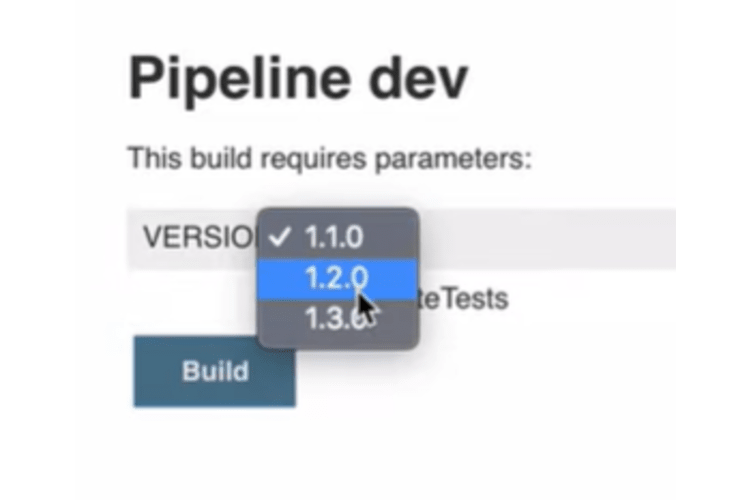
That’s how parameters work so these parameters that we defined in jenkees file apply to all the branches.
You can use that individual in every branch when building it.
The complete code
def gv
pipeline {
    agent any
    parameters {
        choice(name: 'VERSION', choices: ['1.1.0', '1.2.0', '1.3.0'], description: '')
        booleanParam(name: 'executeTests', defaultValue: true, description: '')
    }
    stages {
        stage("init") {
            steps {
                script {
                   gv = load "script.groovy"
                }
            }
        }
        stage("build") {
            steps {
                script {
                    gv.buildApp()
                }
            }
        }
        stage("test") {
            when {
                expression {
                    params.executeTests
                }
            }
            steps {
                script {
                    gv.testApp()
                }
            }
        }
        stage("deploy") {
            steps {
                script {
                    gv.deployApp()
                }
            }
        }
    }
}
Conclusion
How do you use the groovy scripting language to perform awesome things? Let us know in the comments.
This post is inspired from here and this youtube video.